
Welcome to Volume 3 of The Body Transformation Series!
This week, salad prep, and specifically, example to-do lists of what I personally do to prep salad-related foods for my week including recipes I make.
Julian will be covering all things core training.
And we’ll be discussing food & fitness concepts for your best abs appearance.
Make sure you check out Volume 1 and Volume 2 if you missed them as well. Each is loaded with recipes, food preps ideas, workouts for all experience levels and tips and secrets Julian and I share only with clients!
Let’s get down to business..
Recipe of the Week: Salad prep is our theme, as well as individual salad recipes and prep ideas.
Workout of the Week: Core training videos for men (performed by Julian) and women (performed by Vanessa) for all experience levels.
Tips of the Week: 3 food tips for washboard abs often forgotten… are you missing these crucial steps in your routine?
As always, you can click each above to jump down to that section of the post.
Recipe of the Week: Salad prep & recipes
I’m going to cover basic salad prep that I personally do on a weekly basis, which will include basic foods I get, prep, and keep handy in the fridge on a weekly basis for when I want to throw together a salad in just minutes. We’ll cover a few salad dressing recipes I love, as well as a cheat I use for 10-second dressing. And then we’ll cover specific recipes I like to make as well as prep for my week.

Let’s start with the basics. Pictured above is a scaled down version of foods I’ll usually prep each week and keep in containers in my fridge when I need to put together a salad; especially when I’m on the go and need something quick. The time investment in prepping foods I’ve learned ultimately saves you time during your week and sets you up for “real food success”.
Here’s my grocery list each week for salad prep foods:
3-4 packages of lettuce: basic mixed greens
beets: as pictured above, I’ll buy, steam, dice up and keep in my fridge.
heirloom tomatoes: I’ll buy 2-3 and usually if I know I’m going to have a marathon kind of week, I’ll pre-slice at least one.
bell peppers: I’ll buy one of each color and dice up to keep in the fridge
fresh fruit: I like tropical fruits in my salad, as well as strawberries and blueberries. The berries I’ll keep in the fridge in the containers they came in (non-sliced). However, if I get a mango for example, I’ll peel, pit, and dice it up and keep in a container in the fridge. If I buy 3-4 mangoes, I’ll usually do this to 1, maybe 2.. leaving the other two to dice up when I need them.
brussels sprouts: I’ll buy a bunch of brussels and pre-cook them and keep them in a container in the fridge
broccoli: I’ll buy 2 large heads usually and pre-steam.. fridge.
cauliflower: same, 2 large heads usually and pre-steam.. fridge.
carrots: I’ll buy a bundle of carrots and either pre-cut them to munch on, or I’ll shave them like pictured above so I can toss in salads.
avocado: I won’t prep avocado in terms of slicing, only because as we know it gets brown.
These listed above are the usual suspects each week. They’re prepped, in the fridge, and when I need a homemade organic meal or if I’m on the go and I need to take food with me, I’ll simply take one of my to-go containers and add a bed of lettuce and then grab whatever I want and toss it in my salad container. This allows me to put together a nutritious salad in just minutes. If I want to add a protein, I’ll use something like my slow-cooked orange chicken recipe.
Conversely, if I were to cook beets, broccoli, cauliflower, brussels sprouts, etc every single time I needed a meal, it would take 20-30 minutes each time with prep-cook-clean up, right?
So use a prep like this to your advantage to save a lot of time. Spending 1-2 hours in the kitchen on a Sunday for example, prepping foods for your week, will save you that Monday through Friday 20-30 minute window for making the foods each time. It’s a wash, and we’re usually busier during the week.
Set yourself up for healthy wholesome real food success.. and remember the old saying –if you fail to plan, plan to fail.
Other considerations: I like to be a locavore (support local) as much as I can so I try to hit the farmers market each weekend. If there are other fruits and vegg that are in season, I’ll most definitely add those to my routine above. I encourage you to support your local farmer in your own area as well. Not only is it great for your local economy, the food is more fresh and nutritious, usually picked that morning or the day before for minimal “farm to table” transit time (hard to find that in grocery store), and you’re able to talk to the farmer.. they’re in fact the ones usually at the farmers market and you can ask how they grow their food, use organic practices (not everything has to be certified organic), and more.
If you’re new to being a locavore, check out my post 10 Tips on Becoming a Farmers Market PhD. These are the tips, secrets, questions you can ask and more I’ve learned from over a decade of attending farmers markets.
Now that we got basic prep covered, let’s dive into some specific recipes I’ll prep for my week!
First up, dressings…

Pictured above are four dressings I love for my salads and I’ll prep and keep in the fridge. The ingredients below are for each, and the directions are simple for each: I just toss all the ingredients into my blender and whiz it up.
Cilantro-Blood Orange Dressing
- 1 large blood orange, squeezed
- 2 tablespoon cilantro
- 1/2 teaspoon garlic powder
- 1/2 teaspoon garlic pepper
- 1/2 teaspoon dill, dried
- 1/2 teaspoon coconut sugar
- 1/4 cup olive oil
- pink and pepper to taste
Honey Tangerine Dressing
- 1 large Honey Tangerine, squeezed
- 1/4 cup olive oil
- 1 tablespoon dijon mustard
- 1/2 teaspoon garlic pepper
- 1/2 teaspoon garlic powder
- pink salt and pepper to taste
Caesar Dressing – dairy free
- 1/4 cup olive oil
- juice of 1 lemon
- 1/2 teaspoon garlic powder
- 1 teaspoon anchovy paste
- pepper to taste
- optional: 1 pastured, organic raw egg yolk (no raw factory farmed)
Ra[w]nch Dressing
- 1/2 cup raw cashews, soaked 4 hours in water then dried
- 1 tablespoon raw tahini
- 4 tablespoon light coconut milk
- 1/2 tablespoon dijon mustard
- 1/4 cup fresh parsley
- 1/4 cup fresh chives
- 1/2 teaspoon garlic powder
- 1/2 teaspoon onion powder
- pink salt & pepper to taste
- about 1/2 cup of water to thin it out at the end

Pictured above is one of my favorite sprouted hummus brands to buy – Majestic. I wanted to include this in this post because I’ll buy 3 or 4 of these containers each week and use them as FAST salad dressing. What I mean by “fast” salad dressing is that I’ll add water to each container and shake it up so it becomes a dressing consistency. Super quick way to have a dressing for a salad, keep a container handy at work, when you’re on the go, etc. And not only do I like Majestic because their hummus is sprouted, but also because they taste amazing and have great flavors. There is no need to add other ingredients… just add water and you’re set.
Now on to the salad recipes!

Spinach Quinoa Salad with Strawberry & Goat Cheese
Awesome salad idea with fresh organic flavors. Strawberry-Goat Cheese-Quinoa combo is one of my favorites.
Ingredients:
1/2 cup cooked sprouted quinoa
4 cups fresh spinach (not rocket science, we’re making salad- whatever amount you want really)
2 tablespoons sun-dried tomato hummus dressing (Majestic, described above)
Nice handful of strawberries, sliced
About 1/2 cup of goat cheese, crumbled
Directions:
1. Add your spinach to a bowl with your dressing and toss, getting all the leaves coated. Add your quinoa, strawberries and goat cheese and toss
Optional: You could add some chicken or even salmon to this and all the flavors would be quite good together.
Kitchen Notes:
1. If you’re dairy free, omit the goat cheese. If you’re grain-free, omit quinoa. If you’re both, maybe you want to make a different salad below 😉
2. If you want to go omnivore with this salad, add warm chicken. Toss entire salad with it still warm. Spinach gets a little wilted and goat cheese gets creamy.

UnTraditional Coleslaw with a Coconut Yogurt Dressing
This is a salad I like to prep and keep in the fridge when I need a meal or vegg on the go and works great as a side dish for most any meal. Rather than traditional mayo, we’re going to use a much more healthy coconut yogurt dressing.
Ingredients
4 cups purple cabbage, shredded (1/2 – 1 head cabbage should do the job)
Equal parts green cabbage, shredded
1/2 red onion, finely diced (even minced)
8 ounces plain coconut yogurt (I’m liking this brand right now, cleanest I’ve found to date)
1 bunch cilantro, chopped
zest of 1 lemon
juice of 1 lemon
1 tablespoon stone ground mustard
big pinch pink salt & pepper
Directions
1. Shred your cabbages. I like to use the big “teeth” on a grater like this. You can also use a food processor or slice it up.
2. Add your shredded cabbage to a bowl with your onion, cilantro, lemon zest. Toss it around with your hands just to get it mixed.
3. Then add your coconut yogurt, lemon juice, mustard, pink salt and pepper on the top of the mixed slaw. Get in there with your hands and fingers and get it all nice and incorporated.
4. Once done, taste for salt and pepper and adjust.
Great little salad prep dish you can keep in the container in the fridge.

Rainbow Quinoa Lentil Salad Stuffed Bell Peppers
This is one of my favorite salads to meal prep for the week. It has tons of color (nutrients) and flavor
Ingredients:
1 package Sprouted lentils (I’ve been using TruRoots lately)
1/2 cup sprouted quinoa (TruRoots)
1 bunch cilantro, chopped
1/2 red onion, finely diced
1 Yellow, Orange, Red bell pepper (tops chopped and added to salad, bottoms hollowed-out)
15-20 cherry tomatoes, halved
15-20 pitted kalamata olives, halved
1/2 cup Curry-Turmeric Sprouted Hummus (Majestic)
Directions:
1. Cook your lentils and quinoa per the package. Once done, add to a bowl and add your hummus. Now if you don’t have Majestic where you’re located, add another seasoned hummus of your liking (sprouted preferably). With the lentils and quinoa still warm, the hummus will incorporate really easily. Add pink salt and pepper and stir everything in.
2. Let the mixture cool to room temperature (or near it), then add all your other prepped ingredients. Stir everything in and tell me that doesn’t taste awesome?! 🙂
If you’re serving these and want the display to look nice (see picture), fill up your hollowed out bell peppers. I’ve also filled these up and just kept them in the fridge for an easy healthy grab when I’m on the go. One other option is slicing the bell peppers into finger food like scoops, and serve as an appetizer (center a big bowl of your lentil/quinoa salad with the bell pepper pieces around it). And of course, you can simply just keep the salad in a container in the fridge and eat as you please.

Tropical Cilantro-Jalapeno Salad (when really on the go, fast!)
There really isn’t a recipe for this, this is more of a quick cheat to share that I do when I’m really on the go and I don’t want to reach for unhealthy food.
So pictured we have three main things: romaine lettuce, cilantro-jalapeno hummus (Majestic), and a mixed tropical fruit
All three foods I picked up at Whole Foods.
This is when I fumble the ball and don’t have foods prepped, in between appointments and hungry, and/or just need a quick healthy salad I can grab if I’m on the go.
The romaine is a package of pre-cut organic romaine. One container of cilantro-jalapeno hummus. One container of Whole Foods tropical fruit.
As I described in the salad dressing section above, I’ll literally open the container of hummus, add water, close lid, shake. This turns it into dressing consistency quick. 10 seconds.
The romaine lettuce is the one that comes in the rectangle container with lid. I’ll add dressing, close lid, shake that up. 10 more seconds.
Finally I’ll mix in the fruit.
Entire salad is done in about a minute and you’ve got fresh organic salad when on the go.
Of course you can add a protein of your choosing to this as well..

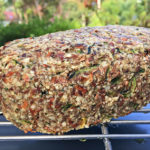
Indian-spiced CauliRice
Another one of my go-to favorites to prep for the week. Very versatile dish. Can be used to eat alone, as well as a base for a grain-free rice bowl with protein of choice.
Ingredients:
1 large cauliflower, “riced” (about 4 cups when riced)
10-15 dried turkish apricots, each diced into 6 small pieces
1 medium onion, diced (about 1 cup)
1/3 cup raw cashews, halved (if I have whole cashews, I’ll grab a handful, crush in my hands a couple times and sprinkle)
1 bunch cilantro, chopped (about 1 cup)
1 tablespoon red palm oil (I use Nutiva – it’s sustainably sourced)
1 tablespoon ground curry powder
1/2 tablespoon ground cumin powder
1/2 tablespoon ground coriander powder
1 teaspoon garlic powder
1 teaspoon cinnamon
pink salt and pepper to taste
Optional: 1/4 coconut milk (see step 3 below)
Oil Options: I like to use red palm oil for this Indian style caulirice because it gives it a great golden color and red palm oil is a very nutritious calorie source loaded with fat soluble vitamins A & E (actually the most for any plant-based oil). You can easily use coconut oil as well.
If you want a kick, chili powder or cayenne will work in this dish as well.
Directions:
1. Add red palm oil to medium heat pan with your onions and a little salt and pepper. Let them cook for about 8-10 minutes, or until they start to get translucent.
2. While the onions are cooking, break your cauliflower into florets and add to a food processor or blender to make your “rice”. Simply whiz up or pulse, making sure not to process for too long or it will turn into “cauli mash”, as in, faux-mash potatoes.
Update: If you have a grater like this, you can also palm the entire cauliflower by the stalk and grate the head on the big grating teeth (careful with your fingers & knuckles). This is actually my preferred method now mainly because less clean up than hauling out the food processor, etc.
3. When the onions are cooked to your liking, turn the heat to low and add you cauliflower, apricots, cashews and spices. Mix everything real well and you’re going to let it get happy for about 5 minutes on low heat. Optional: this is where you’ll add your coconut milk too. The coconut milk gives it a creaminess. Try a 1/4 cup mixed in.. I’ve done with a 1/2 cup too. Both work. Add to your palate.
4. After the 5 minutes, transfer to a bowl. Mix in your chopped cilantro. Taste it for salt/pepper.
Fineto. Great dish to serve your family or keep prepped in the fridge.

Raw Kale Blood Orange Salad
This salad is raw and loaded with fresh flavors.
Ingredients:
1 bunch of purple kale (about 2 cups, but again.. not rocket science, we’re making salad)
1 bunch green kale (same)
1 blood orange, peeled and sliced
1/4 cup raw almonds
cilantro-blood orange vinaigrette (see dressing section above)
Directions:
1. This is a quick one.. simply shred the leaves of the kale with your hands (removing the stalks) and place in a bowl.
2. Add your oranges and almonds with the amount of dressing you desire and toss.
Raw. Fast. Flavor. This one is a winner.

Asian Chopped Salad
This is great to make with the Honey Tangerine dressing in the salad dressing section above.
Ingredients:
1/2 head green cabbage, chopped
1 medium head of romaine lettuce, chopped
1 large carrot, shredded
1/2 small red onion, finely sliced
1/2 cup raw cashews
Couple handfuls of snow peas, cut in half (about 24-30)
3 mandarins, peeled and pieces separated
Directions:
1. Add everything in a bowl, add your Honey Tangerine dressing and toss. Simple as that.
Kitchen Notes:
1. If you want to add some chicken to this, tastes great!
Julian here, and in this volume of The Body Transformation Series we’re going to cover the core!
A tight, defined midsection is perhaps the most common goal for fitness enthusiasts and those looking to lose some weight. There are several factors that will ultimately determine abdominal definition and having a visible “six pack”, including: genetics, caloric balance, body composition (low body fat is key), and fat distribution. Contrary to popular belief, performing a ton of ab exercises without taking these other factors into consideration will NOT help you lose fat that has accumulated in your midsection!
When all of these factors are accounted for, you must then develop a solid workout plan to target all the muscles in the midsection for optimal abdominal development. There a numerous muscles that make up the midsection or “core,” but for the sake of this post, we will focus on the outer muscles: rectus abdominis, external obliques, serratus anterior, and intercostals. These are the muscles responsible for stabilization, rotation, and flexion of the torso. I am not going to go into detail about other core muscles, like the inner unit that is responsible for stabilizing the spine, because this would turn into a very long post!
It is important to understand that the abdominal muscles respond to the application of regular stress, just like any other muscle. You must apply the concept of progressive overload and challenge these muscles to FORCE them to change and develop! You wouldn’t perform 50 reps of bench press right? So why would you do 3 sets of 50 crunches?? Train the abs/core the same way you would train your other muscles and stick to 8-15 repetitions, and up to 20 on certain exercises, for a greater challenge. This does not mean you must stop at 10 reps even if you’re not tired. Instead, choose more challenging exercises or add resistance to the ones you are currently doing so that you reach muscular fatigue by the time you reach the previously stated number of reps.
The following exercises are excellent examples to add to your ab/core arsenal! I am a big fan of working the midsection as a whole, as opposed to attempting to “isolate” the rectus abdominis (front abs). You simply get more bang for your buck! Most of these exercises are activating your core muscles both as stabilizers and prime movers, which basically means they are working double. You may incorporate these as part of your resistance training routine or do them in a superset fashion if you’re really hardcore!
Beginner Male
2) Alternating single leg plank- 20-30 seconds.
Beginner Female
2) Medicine ball twists- 20-30 seconds.
Intermediate Male
2 Physioball pike- 10-20 reps.
Intermediate Female
2) Side medicine ball wall toss- 10 reps each side.
Advanced Male
2) Hanging windshield wipers- 12-16 total reps.
Advanced Female
2) Ab wheel roll-outs on a Bosu- 6-15 reps.
Tips of the Week: 3 often forgotten food considerations for washboard abs
This may not be a surprise to some, but your abs are defined (as in, visible) through the foods you eat, not the amount of crunches you do. As Julian alluded to above, your core muscles should actually be trained in lower rep range. The rectus abdominis (your “abs”) is an anaerobic fast-twitch muscle, yet you see it all the time people train it aerobically doing 30, 40, 50 reps. Not ideal. Once you get the rep range right, you’ve got one piece of the equation. The other, bigger piece of the puzzle is the food you eat. You can spend hours in the gym every week conditioning your core for those washboard abs you want, but if your diet is not dialed in, those abs will never show.
So let’s take a look at a few areas to consider that are often forgotten when it comes to getting your ideal ab conditioning.
1. Food Quality:
Today, food quality (in terms of source) is a factor in any program design. 100+ years ago, it wouldn’t have been. What I mean by that is today we have commercial farming practices and processed foods which became prominent around the first world war. Processed foods was a means to send troops to battle long distances away without food spoiling.. it was a solution then for that particular problem. But as we know now, processed foods have been stripped of the very life force that keeps our body in an optimal state of health. Coupled with commercial farming practices which use chemicals, pesticides, rodenticides, fungicides, herbicides, etc, we have what becomes a double edge sword of inferior, nutrient-deficient, toxin-laden foods.
Well what does this have to do with my abs, Jon? Answer: Fat stores toxins.
So commercial foods will have this double edge sword I speak of, put the body under constant internal stress, and the chemicals and toxins in these foods will be stored in your fat to protect the organs, glands, nervous system, etc. It’s the body’s own protection mechanism to get toxins out of the blood stream and away from these vital areas. So not only will the body create new fat cells for toxins ingested, it will not want to get rid of the fat cells it has and they’ll begin to bioaccumulate in the tissues.
So if your best abdominal appearance is your goal, remember that the least amount of toxins you ingest via food, will result in the least amount of fat cells and overall stress added to the system. Opting for certified organic foods which do not use these chemical farming practices, is ideal. That said, you can eat non-organic certified foods, provided they are from a local farmer or farmers market where you can actually talk to the farmer and ask if they use organic farming practices (but may not have an actual certified organic farm). At the grocery store, you obviously can’t do that.
2. Food intolerance:
Another one often forgotten is food intolerance. Specifically, I’ll touch on gluten, the protein-fraction found in grains. If you have an intolerance to gluten, it will cause inflammation of the gut. Have you ever had a “food baby” or “gluten baby” after eating a bunch of gluten containing carbs? That could be this magic at work. Internally the inflammation will give the external look of the gut protruding outwards and it’s bye bye abs.
If you’re going to eat grain, stick with non-gluten containing grains like corn, rice, buckwheat and millet. You can get pure oats as well, although I’ll add I’ve had to take clients off of oats that claimed to be “100% gluten free” who were very sensitive. I’ve also had to take clients off of meat that was factory farmed. But Jon, meat doesn’t have gluten? This is true, from a properly raised, pastured grass-fed cow. A factory farm cow is often given grains to fatten them up, amongst other toxins to the animal. People sensitive to gluten can have a reaction eating grain fed meat.
So overall, if you’re not seeing your best definition in your core right now and you eat gluten, simply try eliminating it for a few weeks and keep an eye on your definition if it improves. Report back to Julian and I and let us know your improvements!
3. Food ratios right for your unique body:
Finally, the ratios of foods that are right for your unique makeup are critical. Have you ever done one diet and had horrible results? Yet you hear the success stories and/or actually know someone who had great results on that same diet you did? We’re not designed to eat the same way and I talk about this here in regards to we’re all genetically different, geographically different (family tree), and biochemically unique. We all have different requirements for foods.
For example, I thrive on animals foods, fats, veggies and fruit. If I were to eat only veggies, fruit and grains, I would feel and look bloated, not to mention hungry an hour later with fatigue. That’s for ME. Too often I see people arguing over dogmatic views of “my diet is right, your diet is wrong” and it’s a false assumption to think we’re all designed to eat one single way. Never in recorded history has this EVER happened (other than the common denominator that we did all eat real food, not food-like products). We can eat the same NOW in the past century or so because we have the invention of the airplane and commercial refrigeration, but prior to that, we ate local, real food found in our ecosystem. Food an Eskimo would have eaten 100+ years ago (mostly animal foods via availability) would be wildly different than say an inland aboriginal in Australia (mostly plant based), yet both thrived. In today’s world, that would be sort of like someone who is on a ketogenic high animal protein/fat diet and someone on a mostly plants vegetarian diet. Both are right…for THEM.
If you want to read more about how different tribes thrived around the world, I highly recommend Weston A. Price’s book Nutrition & Physical Degeneration:
Learning which foods and ratios are right for YOU (and only you) will dial in your most optimal internal environment, for your best external abdominal appearance.
Did you enjoy this Volume 3 Series? Let us know below in the comments! Any suggestions for recipe themes, workouts, tips/secrets let us know and we’ll use those in future series!


I’ve really been enjoying these series posts. So mch great info! All these salad pictures look beautiful too. The cauliflower rice recipe is now on my list of things to do today! Thank you!!!
Thank you Candice! I hope you enjoy the rice 🙂
Yes I did! Loove the hummus dressing idea for a time saving cheat!
Awesome Heather.. I’ve been using that cheat for years. great one!
Thank you it was a lovely post
You’re very welcome Jamie
Love this post!! As always, you and Julian (oh….let’s not forget gorgeous Vanessa:)) knocked it out of the park!! Great work my friends!!
Thanks Deanna, you rock! Let’s connect soon and do a guest post on Pilates with you
Great post! And a good reminder that there’s not one diet that fits all. Takes time and patience to learn ones own body. Look forward to your other posts.
Ivo, thank you! And very true re: time/patience.
I’m glad you’re enjoying the posts. Many more to come. Cheers
I’d love to know more about “Learning which foods and ratios are right for YOU” – how can I find out what I SHOULD be eating? Do you just follow your body’s cues?
Hi Jessica, awesome! You can definitely follow your body cues..that’s the longer way in terms of figuring that out. which is perfectly fine I”ll add.
I also have an in-depth assessment that will give you a foundation start as well. In the search field on the blog, search “the no-diet diet” and read that blog post to learn more about it. it’s very in-depth and I think there is close to 50 comments on that post that I’ve responded to with detailed answers as well.
Cheers
stumbled on your IG which led me here. I have your website bookmarked on my phone – it’s that important to me 🙂 thanks for all the great tips! Very appreciative of your page 🙂
Hey Deannah, ahh very cool! Really happy to hear you enjoy everything, thank you.